Introduction
Welcome to Rico! This onboarding guide is designed for users who use Rico to create planning assessments and reports. It outlines the core functionality, advanced features, and common troubleshooting tips for each part of the Rico workflow.
By the end of onboarding, you should understand how to:
-
Create and navigate a project
-
Use Rico functionality to perform technical and qualitative assessments
-
Produce high-quality assessment reports in Rico.
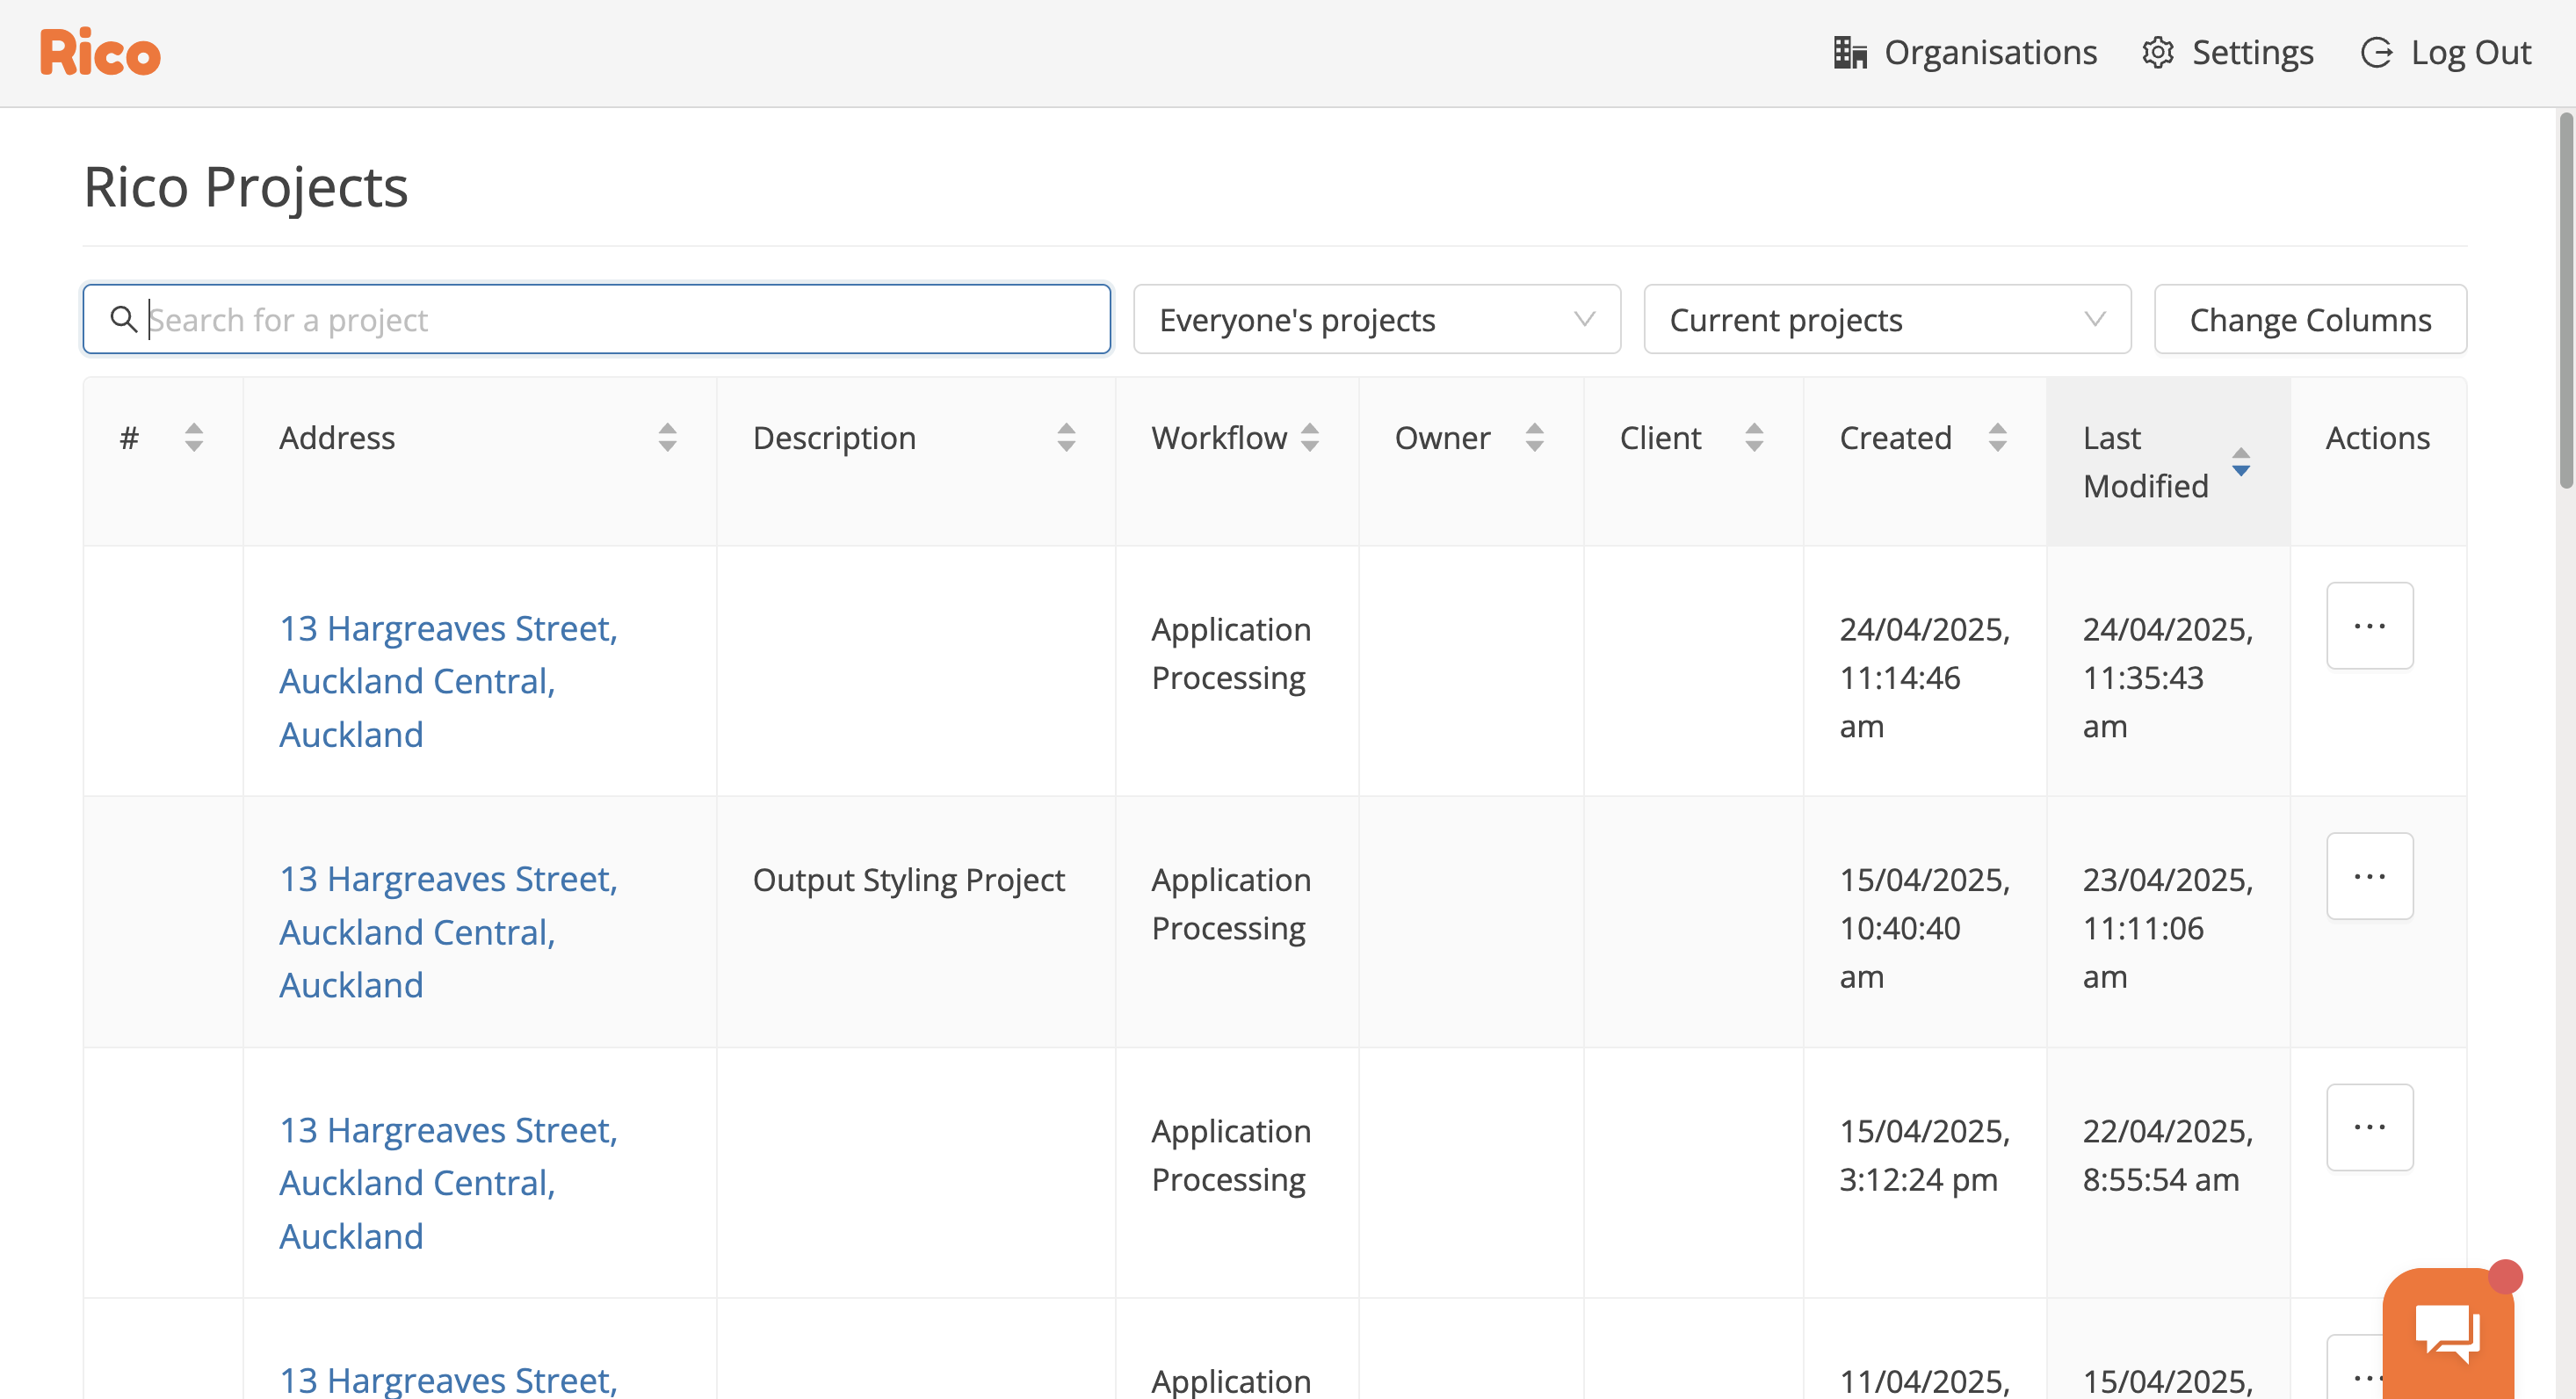
Projects Page
Core Functionality
-
Create, assign, and duplicate projects
-
Switch between “My Projects”, “Everyone's Projects” or select a specific user to view their project list.
Advanced Tips
-
Use the Actions column to assign projects to colleagues
Troubleshooting
-
Can’t see a project? → Switch to “Everyone's Projects”
-
Can’t see other's projects? → Check your role permissions, they may not allow for this
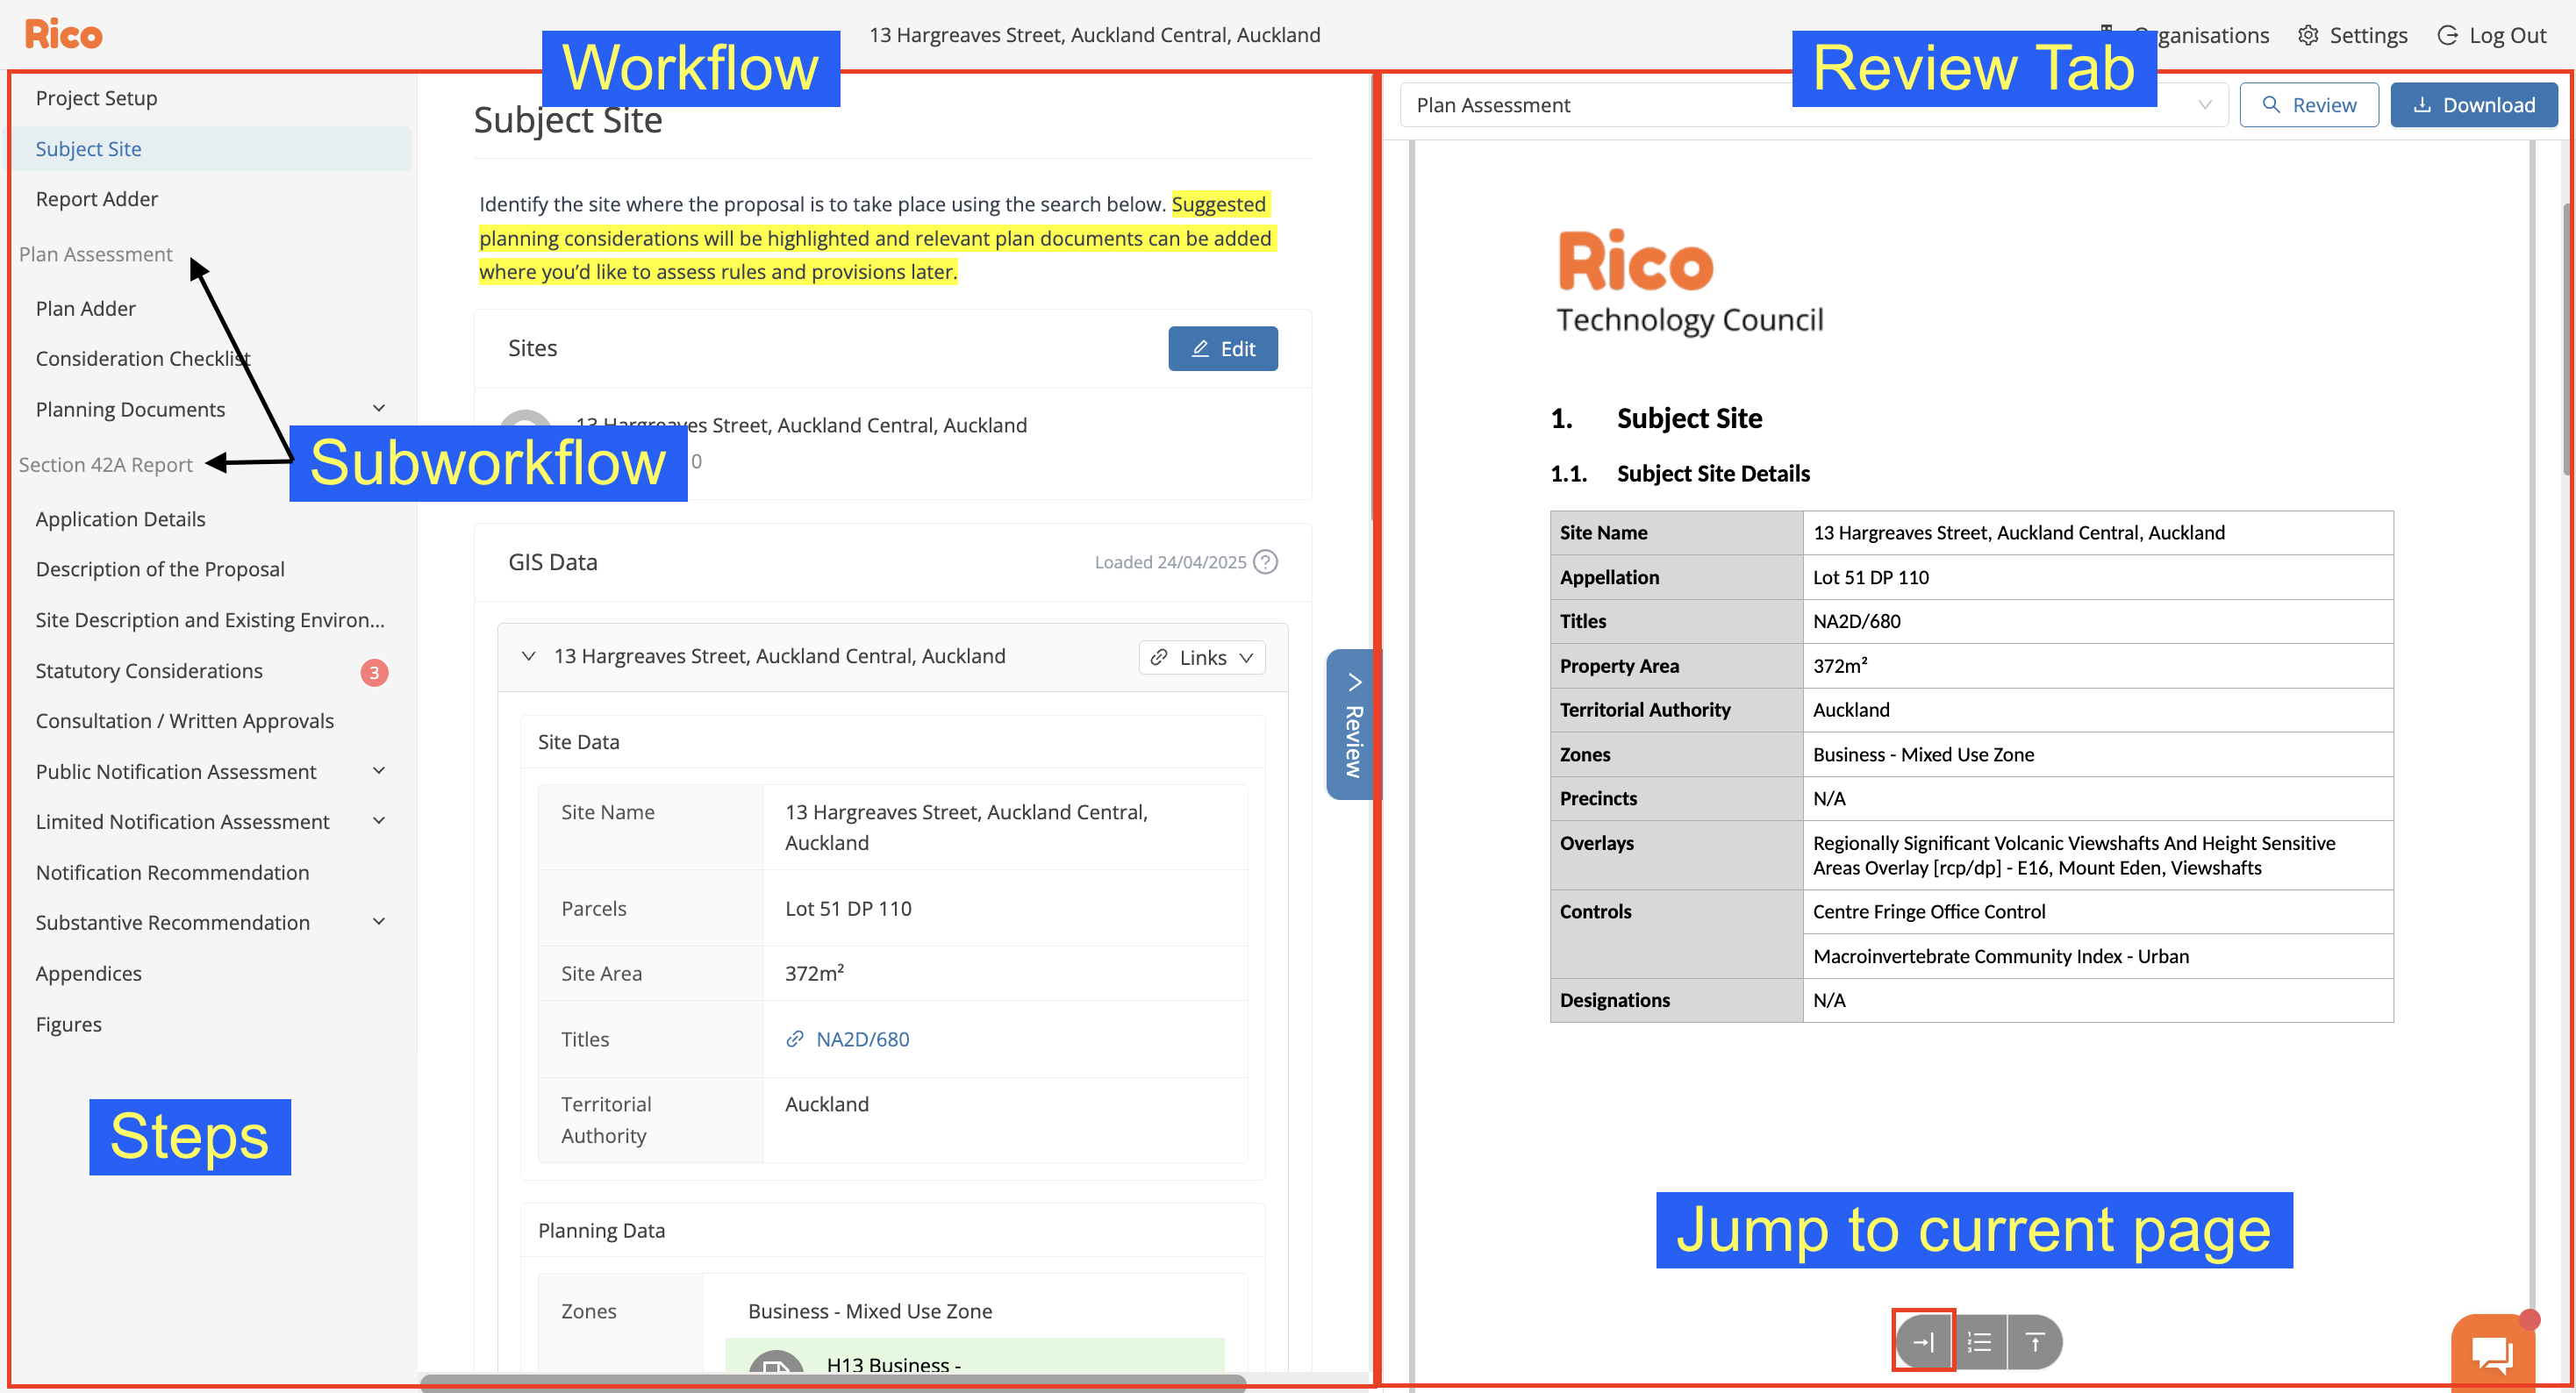
In-Project Interface
Core Functionality
-
Navigate workflow steps
-
Add sub-workflows and reports with the Report Adder (where you have this step - some workflows are fully configured by default)
-
Preview final report output in the Review Tab
-
Work is automatically saved as you go.
-
Reports can be downloaded any time by clicking download in the Review Tab.
Advanced Tips
-
Use “Jump to current page” in Review Tab to quickly navigate to the place in the Report Output you're editing in the workflow.
Troubleshooting
-
Can't see the Review Tab? → This should appear as a blue tab on the right edge of your screen
-
Workflow disappears / gets greyed out when you open the Review Tab? → On larger screens you can see both the Workflow and the Review Tab at the same time. On smaller screens you can adjust the zoom of your browser page (zoom out) until you are able to see and edit both in the same view.
-
Review Tab not showing the right report? → Workflows may produce multiple reports. Check the drop down at the top of the Review Tab to ensure you're looking at the right report.
Helpful resources
👉 Overview of Workflows, Modules and Report Templates
Introduction to Technical and Qualitative Assessments in Rico
Rico is built around a dual assessment structure that separates technical assessments from qualitative assessments, each serving a distinct but complementary purpose. Before going into detail it's important to understand how these two different groups of functionality work.
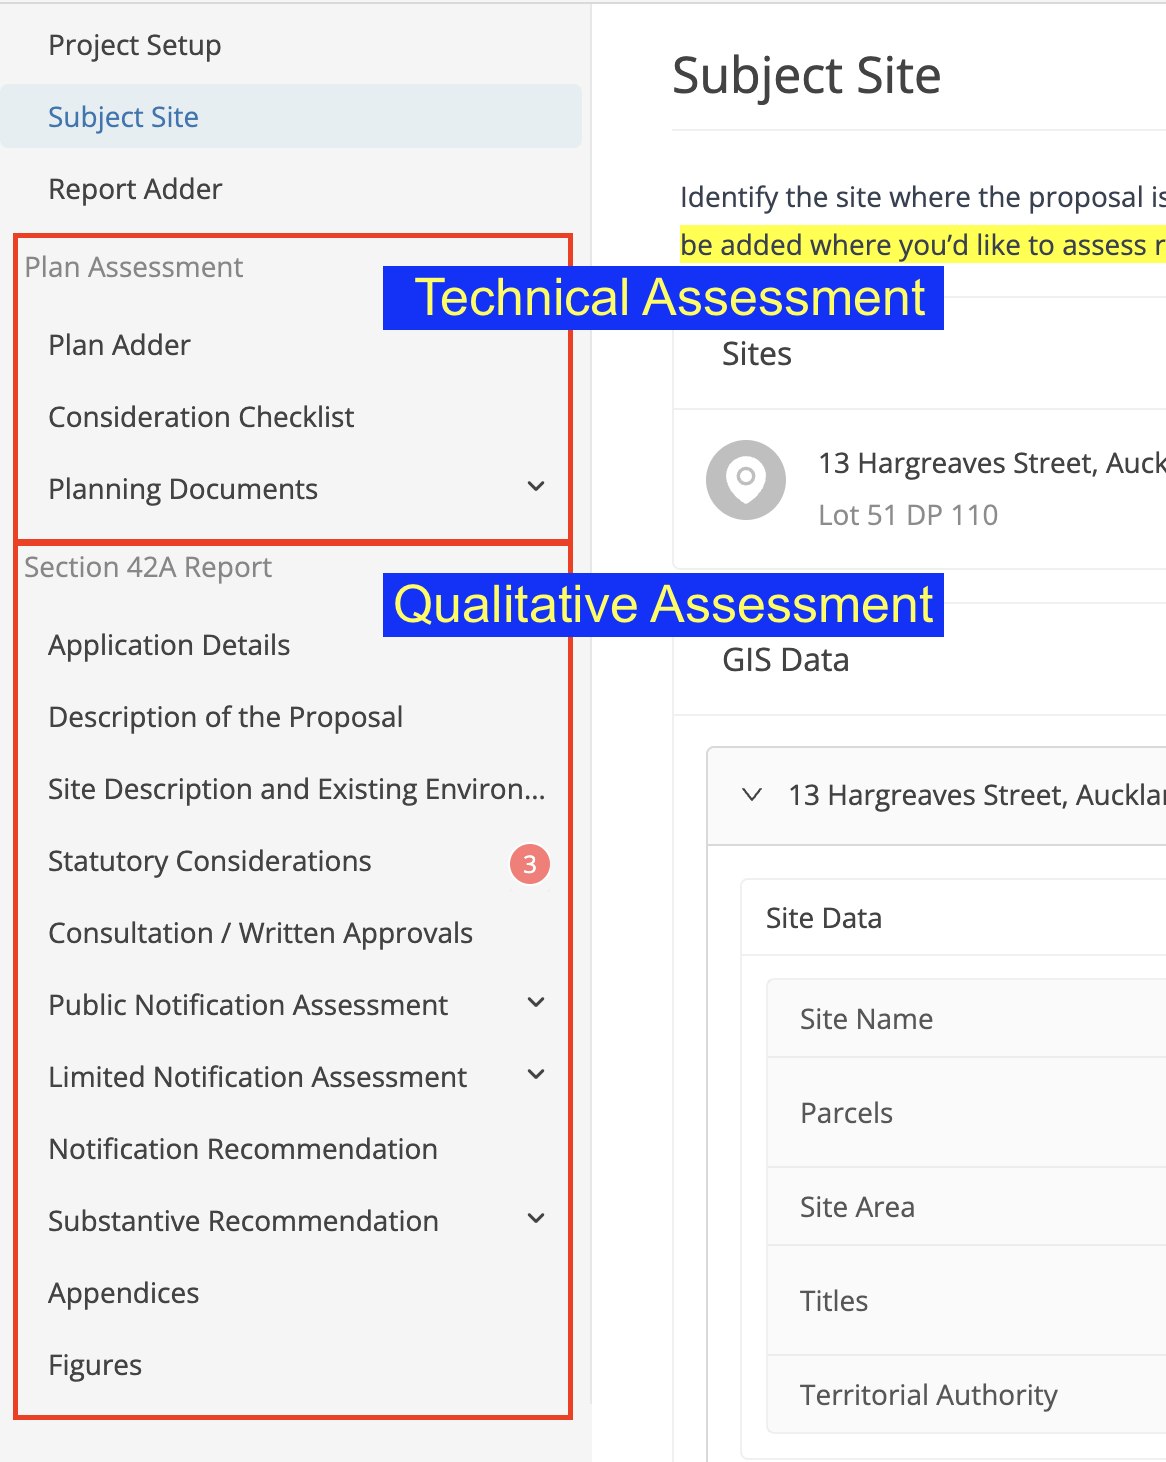
Technical Assessment
-
Structured and checklist-driven, this part of the workflow helps users identify, record, and interpret all relevant statutory planning requirements.
-
Comprises five key components:
-
Subject Site / GIS Integration: Identifies the subject site for the project and relevant planning layers/overlays and spatial features.
-
Checklist: Ensures all potentially relevant issues are flagged for attention.
-
Plan Document Adder: Adds documents to be assessed (with Rules and Provisions Assessment below).
-
Rules Assessment: Determines activity status and identifies reasons for consent.
-
Provisions Assessment: Assesses consistency with planning provisions (objectives, policies, matters of discretion).
-
-
Technical assessments are typically output into a standalone technical report. However, all components of the technical assessment can also be referenced in the main qualitative assessments using the @ or / functions (more on that further down).
Qualitative Assessment
-
Qualitative assessments are typically output into a narrative report that interprets and justifies effects and outcomes.
-
In Rico, this is usually predominantly prepared using text fields tied to workflow steps.
-
Users can embed technical assessment content into the qualitative narrative for clarity, detail and justification.
This structure:
-
Establishes the technical foundation needed to make sound planning judgments
-
Addresses common gaps in underlying understanding, especially for newer or less experienced planners
-
Creates a traceable record of decision logic for reviewers and decision-makers
-
Aligns with Rico functionality
Technical Assessments
Subject Site / GIS Integration
Core Functionality
-
Add the subject site using address, legal description, or title
-
View available site information (e.g. legal information, and planning information such as spatial overlays and planning layers where available).
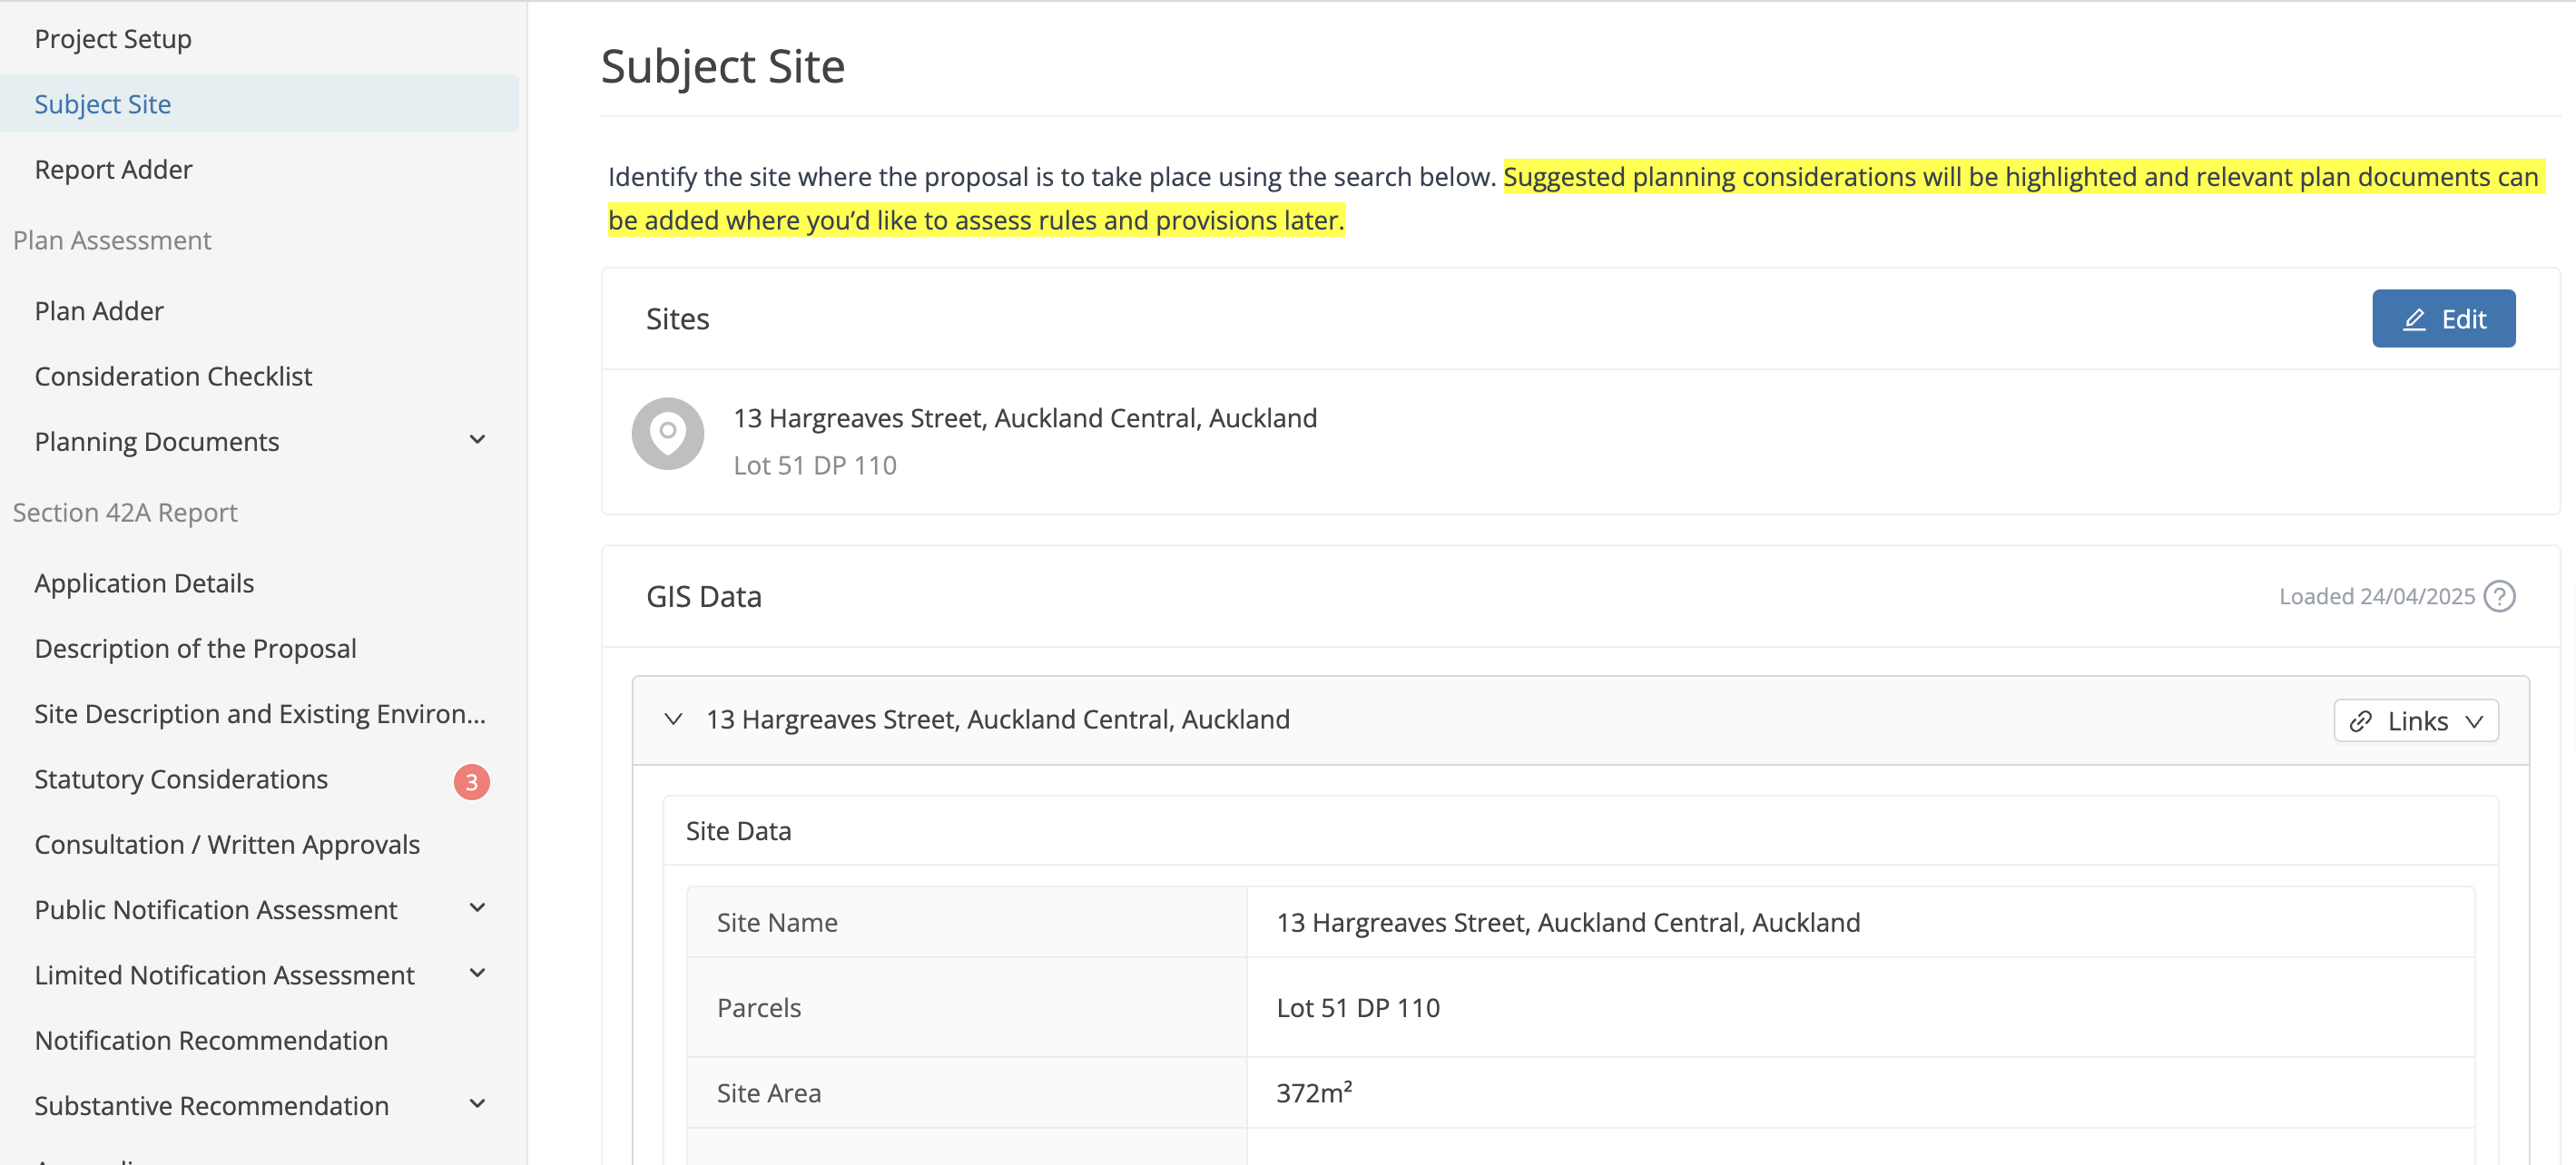
Advanced Tips
-
Draw Custom Site Boundaries for sites without clear legal boundary.
-
Add multiple parcels and merge these when adding site to consolidate into one 'site'.
Troubleshooting
-
Can’t find the site? → Use LINZ
🔗 Using the Subject Site Search
Checklist
Core Functionality
-
Identify relevant considerations and trigger relevant Plan Documents (that can be added for assessment)
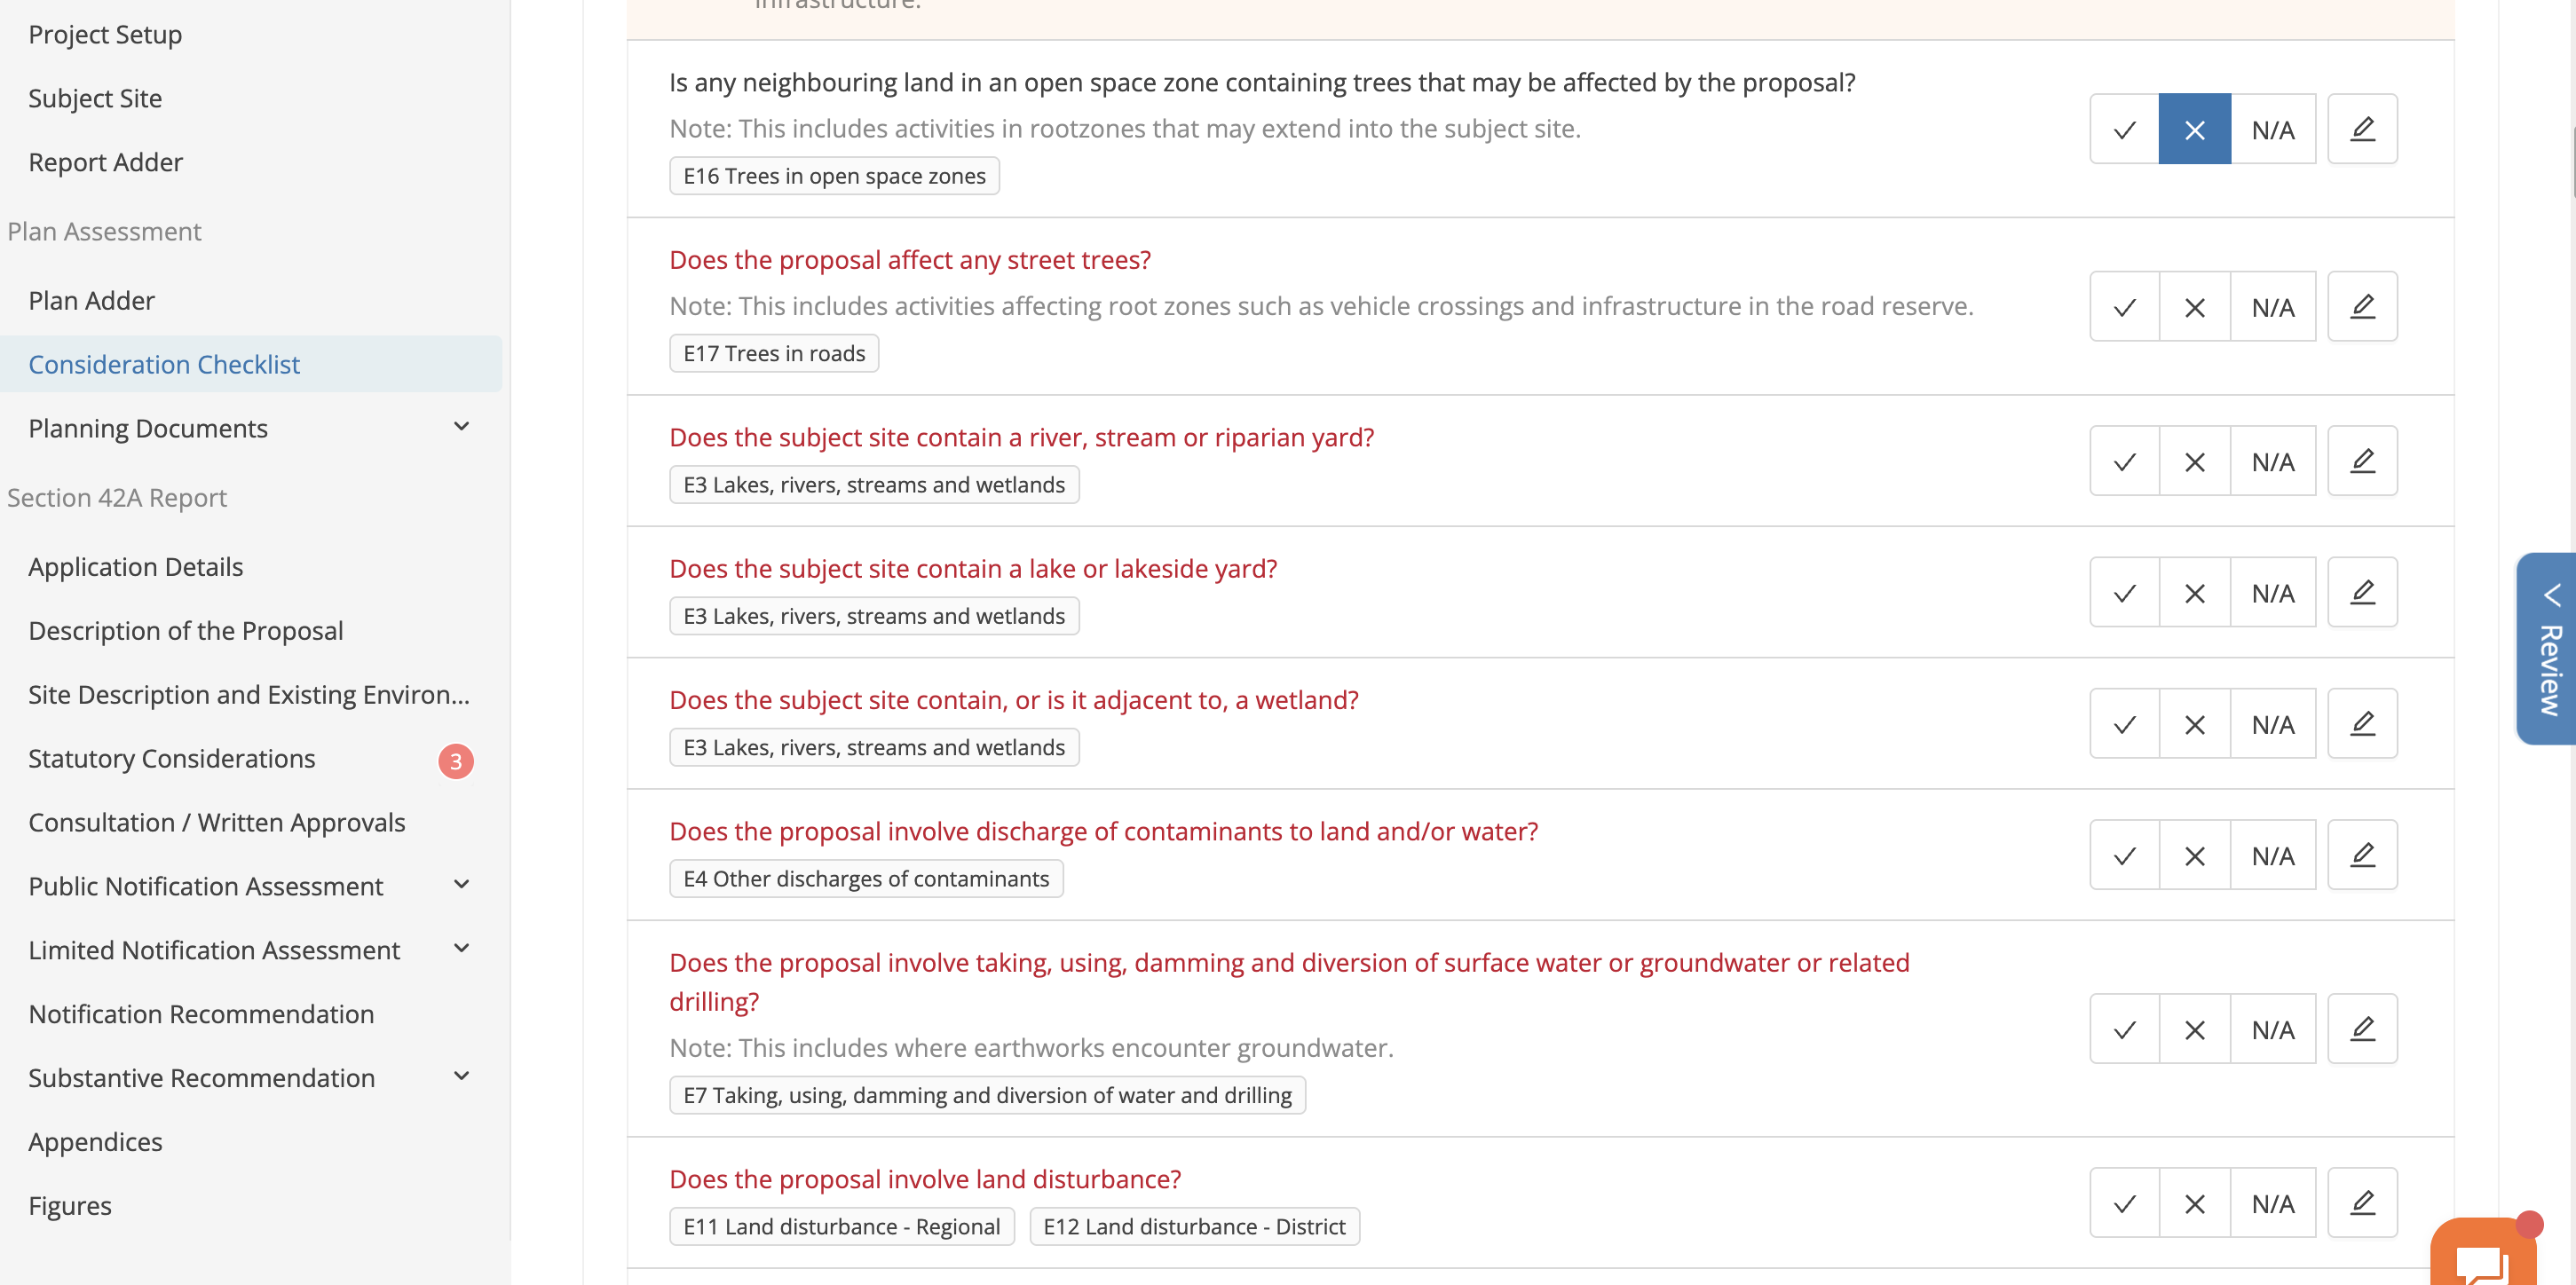
Advanced Tips
-
Use checklists to rule issues in/out—save the need to duplicate this in qualitative assessments (i.e. you don't need to say things you've considered and are not relevant as it's documented in the checklist).
Troubleshooting
-
No considerations shown? → Confirm checklist is configured correctly (questions and considerations are configurable)
Plan Document Adder
Core Functionality
-
Add Plan Documents for assessment steps below (in addition to adding these in Subject Site/GIS Integration and Checklist steps)
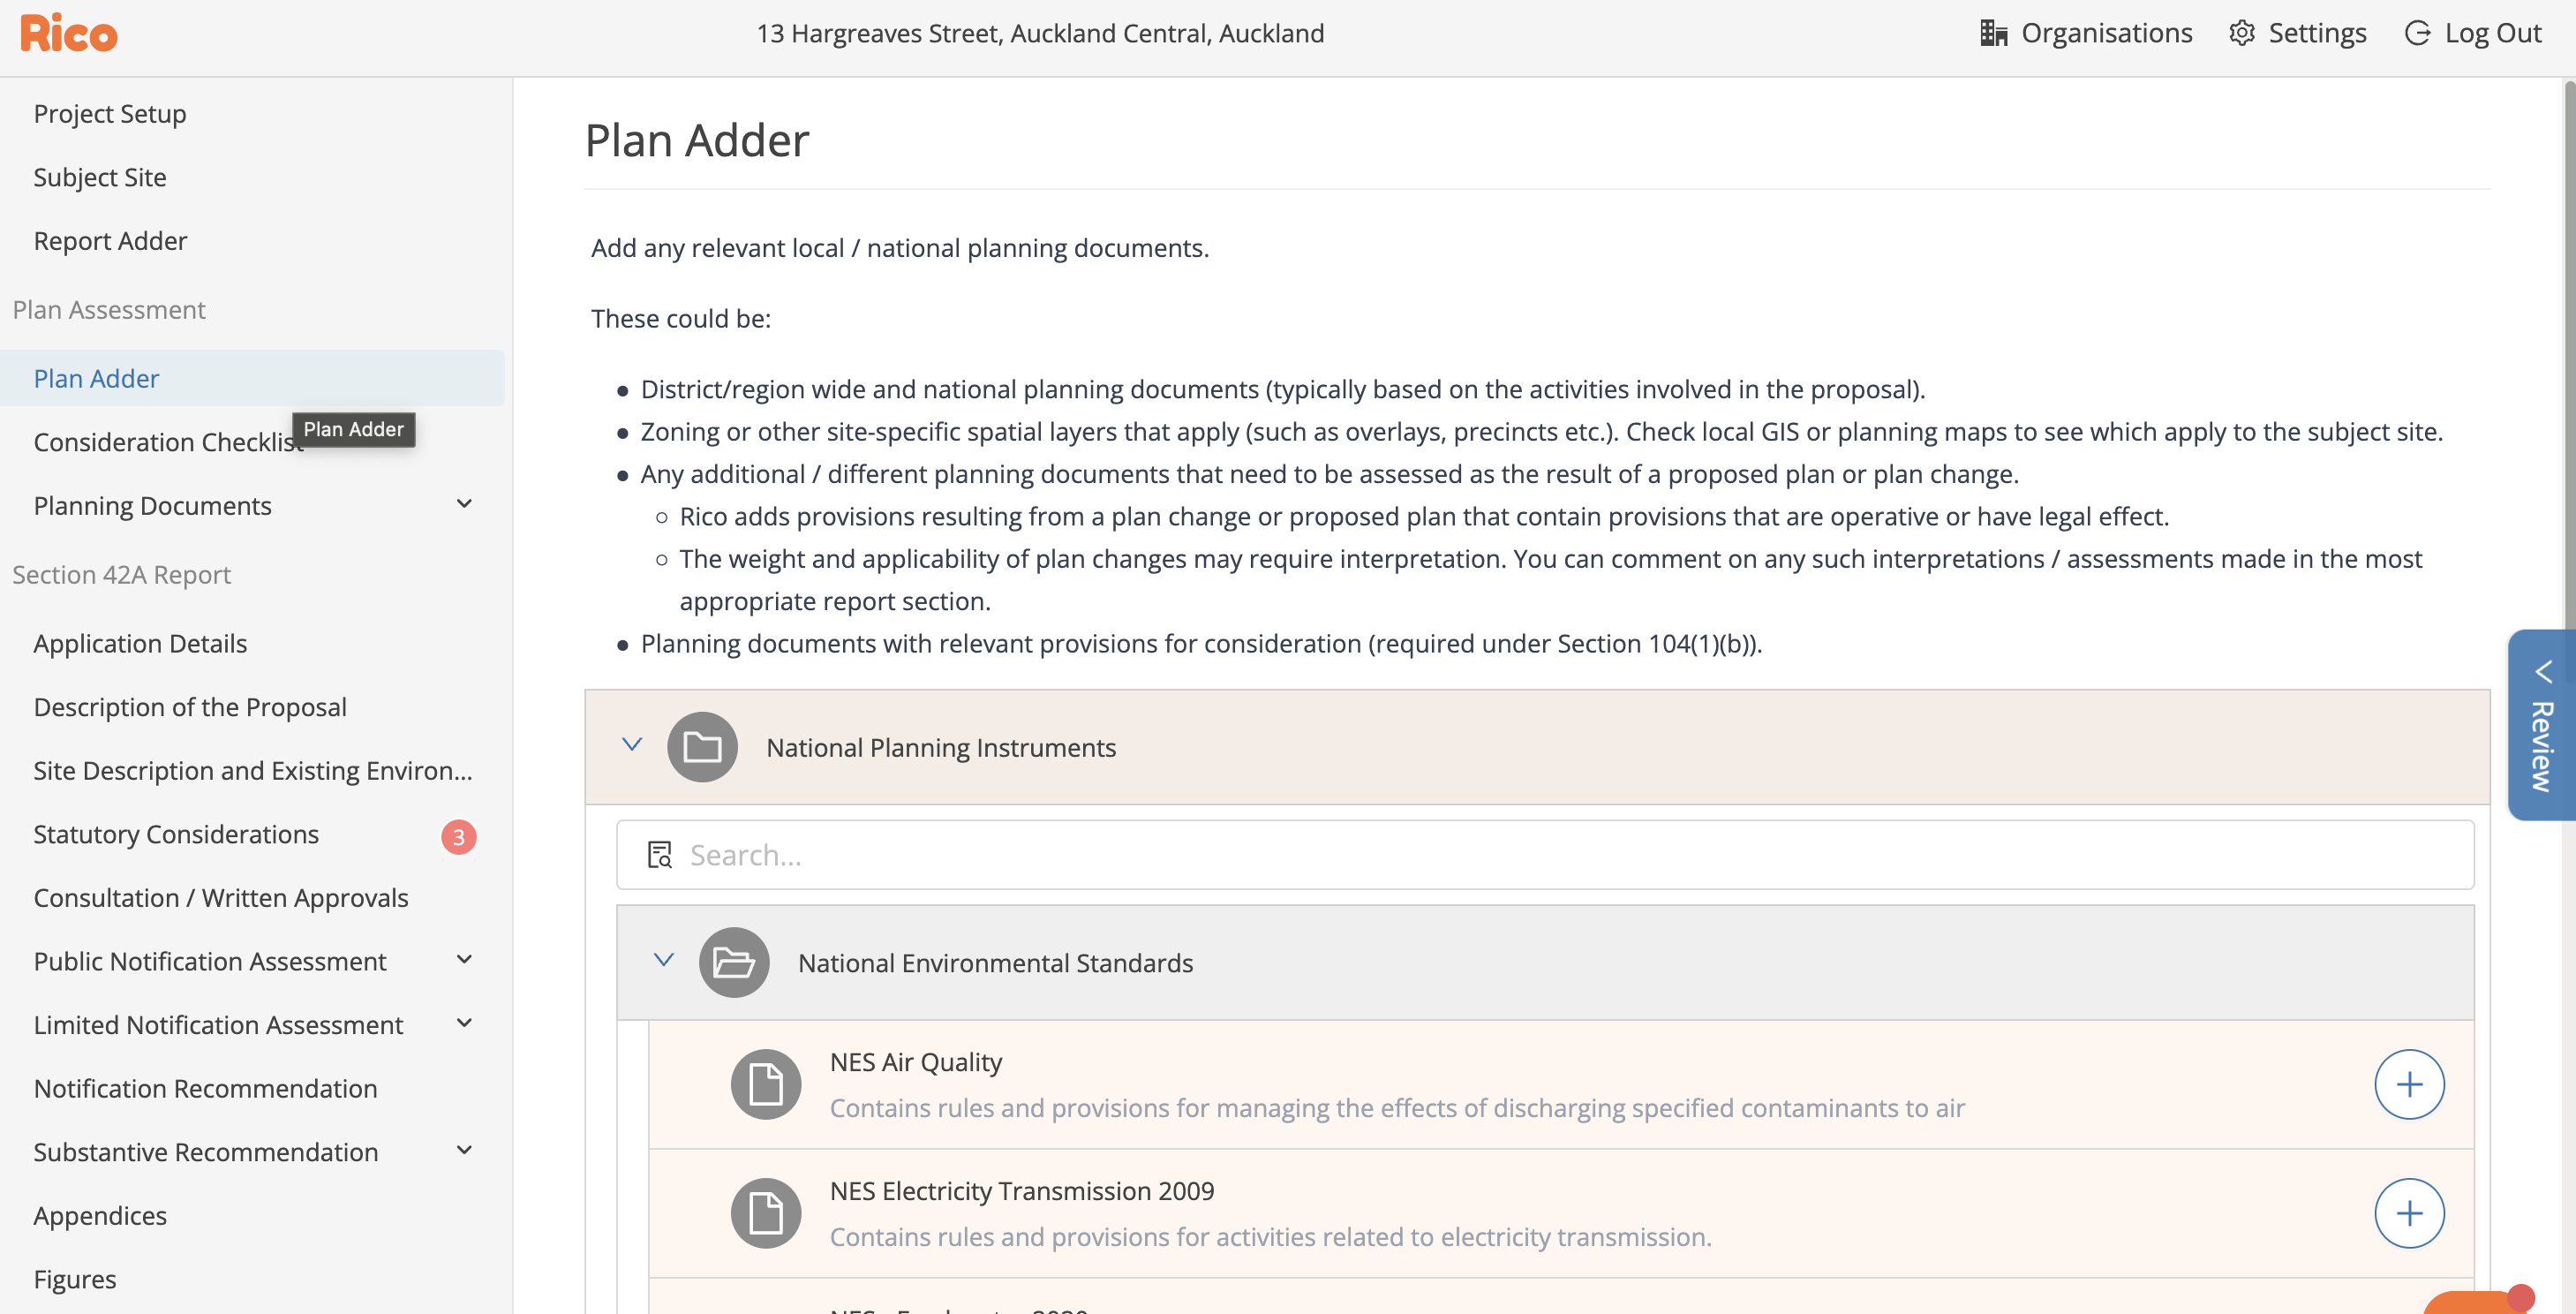
Troubleshooting
-
Site must be added before documents appear in some configurations.
Advanced Tips
-
Add National Plan Documents on this page.
-
Additional Plan Documents relating to Plan Changes also available for assessment where these have changes with legal effect (more on assessing Plan Changes here).
🔗 How Plan Considerations Work
Rules Assessment
Core Functionality
-
Rules assessment combines two different assessment functions:
-
Triggering rules with status – identifies rules that classify elements of the proposal as requiring resource consent or being permitted.
-
Compliance checks – assesses whether the proposal complies with relevant rules, including identifying any non-compliance that triggers further consent requirements.
-
-
Use comment boxes to explain why a rule applies and the assessment made in relation to the proposal.
-
Produce rules assessment tables in technical assessment report. Tables can be inserted into text fields (discussed later) to support qualitative assessments.
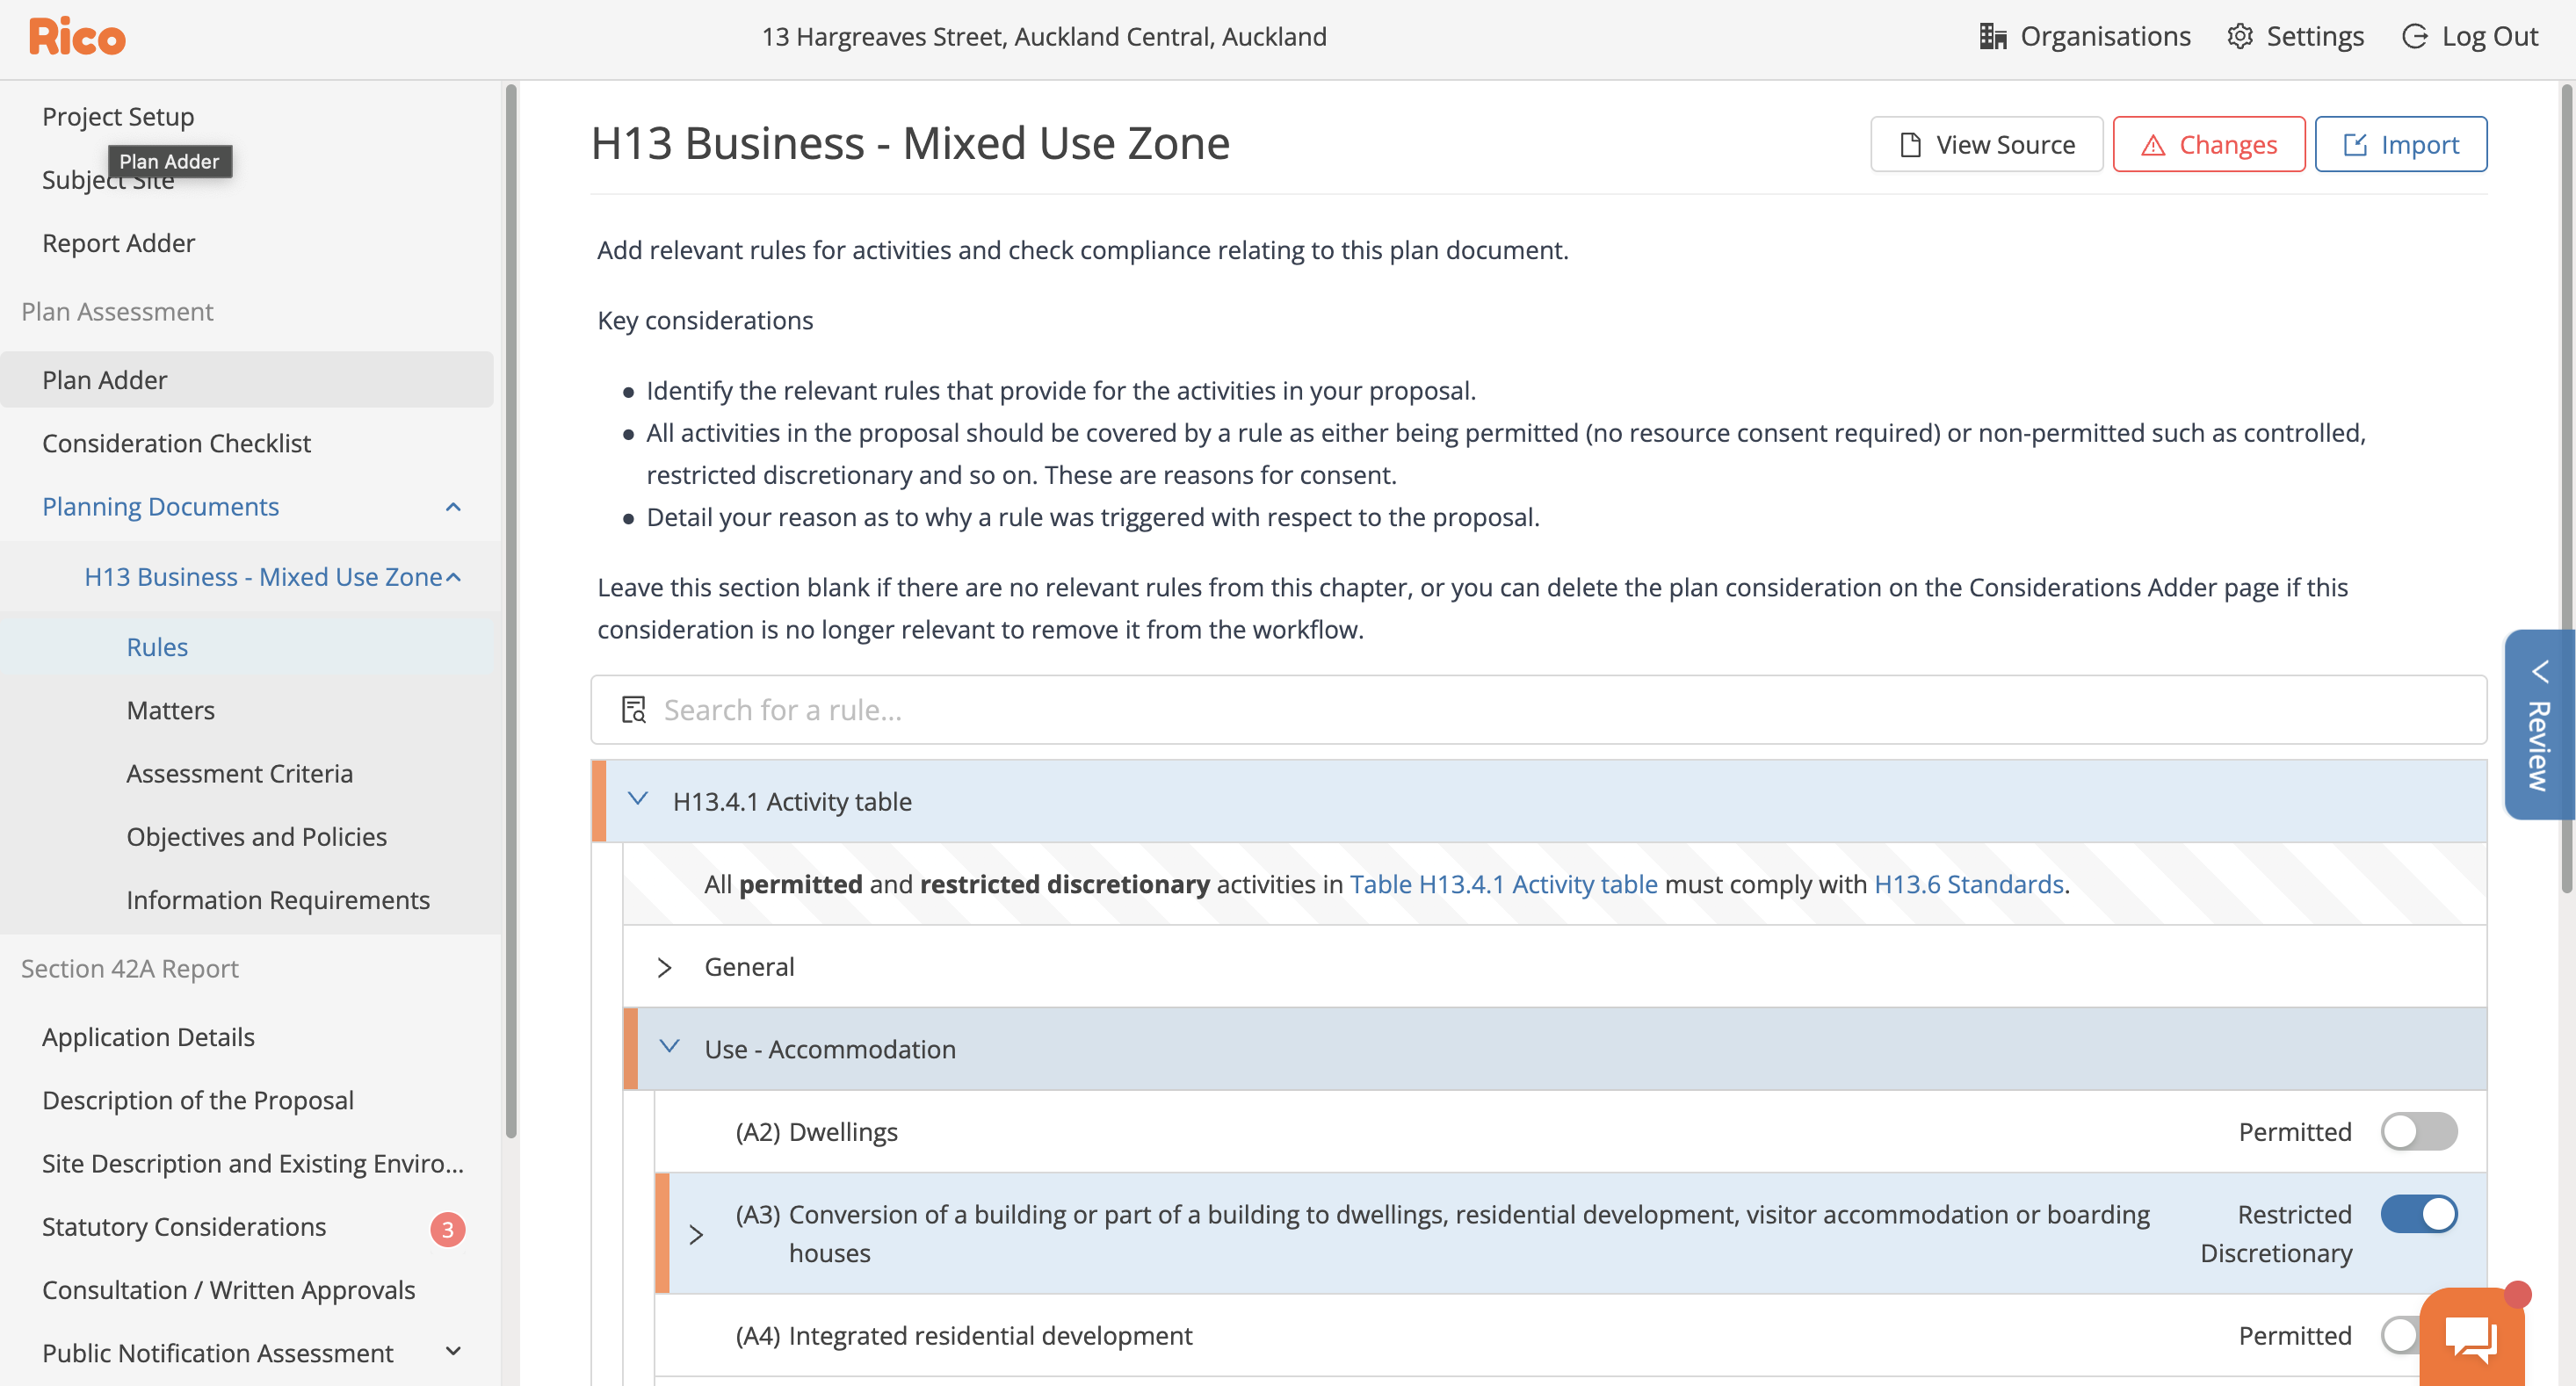
Advanced Tips
-
Use caution when selecting rule levels—assessing higher-level rules marks assessment (i.e. complies, does not comply) against all the sub-rules as well; assess lower level to only mark your assessment against specific sub-rules and keep compliance assessment more precise.
-
Only assess rules relevant to the proposal—this isn’t about assessing the entire plan.
-
Use the question mark (?) icon to mark a rule as "Undetermined" for review later.
-
Avoid overusing "Not Applicable"—only use it where something technically applies but clearly has no relevance.
Helpful resources
🔗 Using the Rules and Standards Assessment (for existing customers)
🔗 Using the Single Plan Assessment (new customers)
Provisions Assessment
Core Functionality
-
Review and select relevant provisions (e.g., objectives, policies, matters of discretion) for assessment.
-
Selected provisions populate a provisions table.
-
Click on a provision to add a comment - these comments appear against the relevant provision and any provisions nested below this.
-
Provision tables may be automatically output into your technical report and can be inserted into text fields (like rules) to be included in your qualitative assessment.
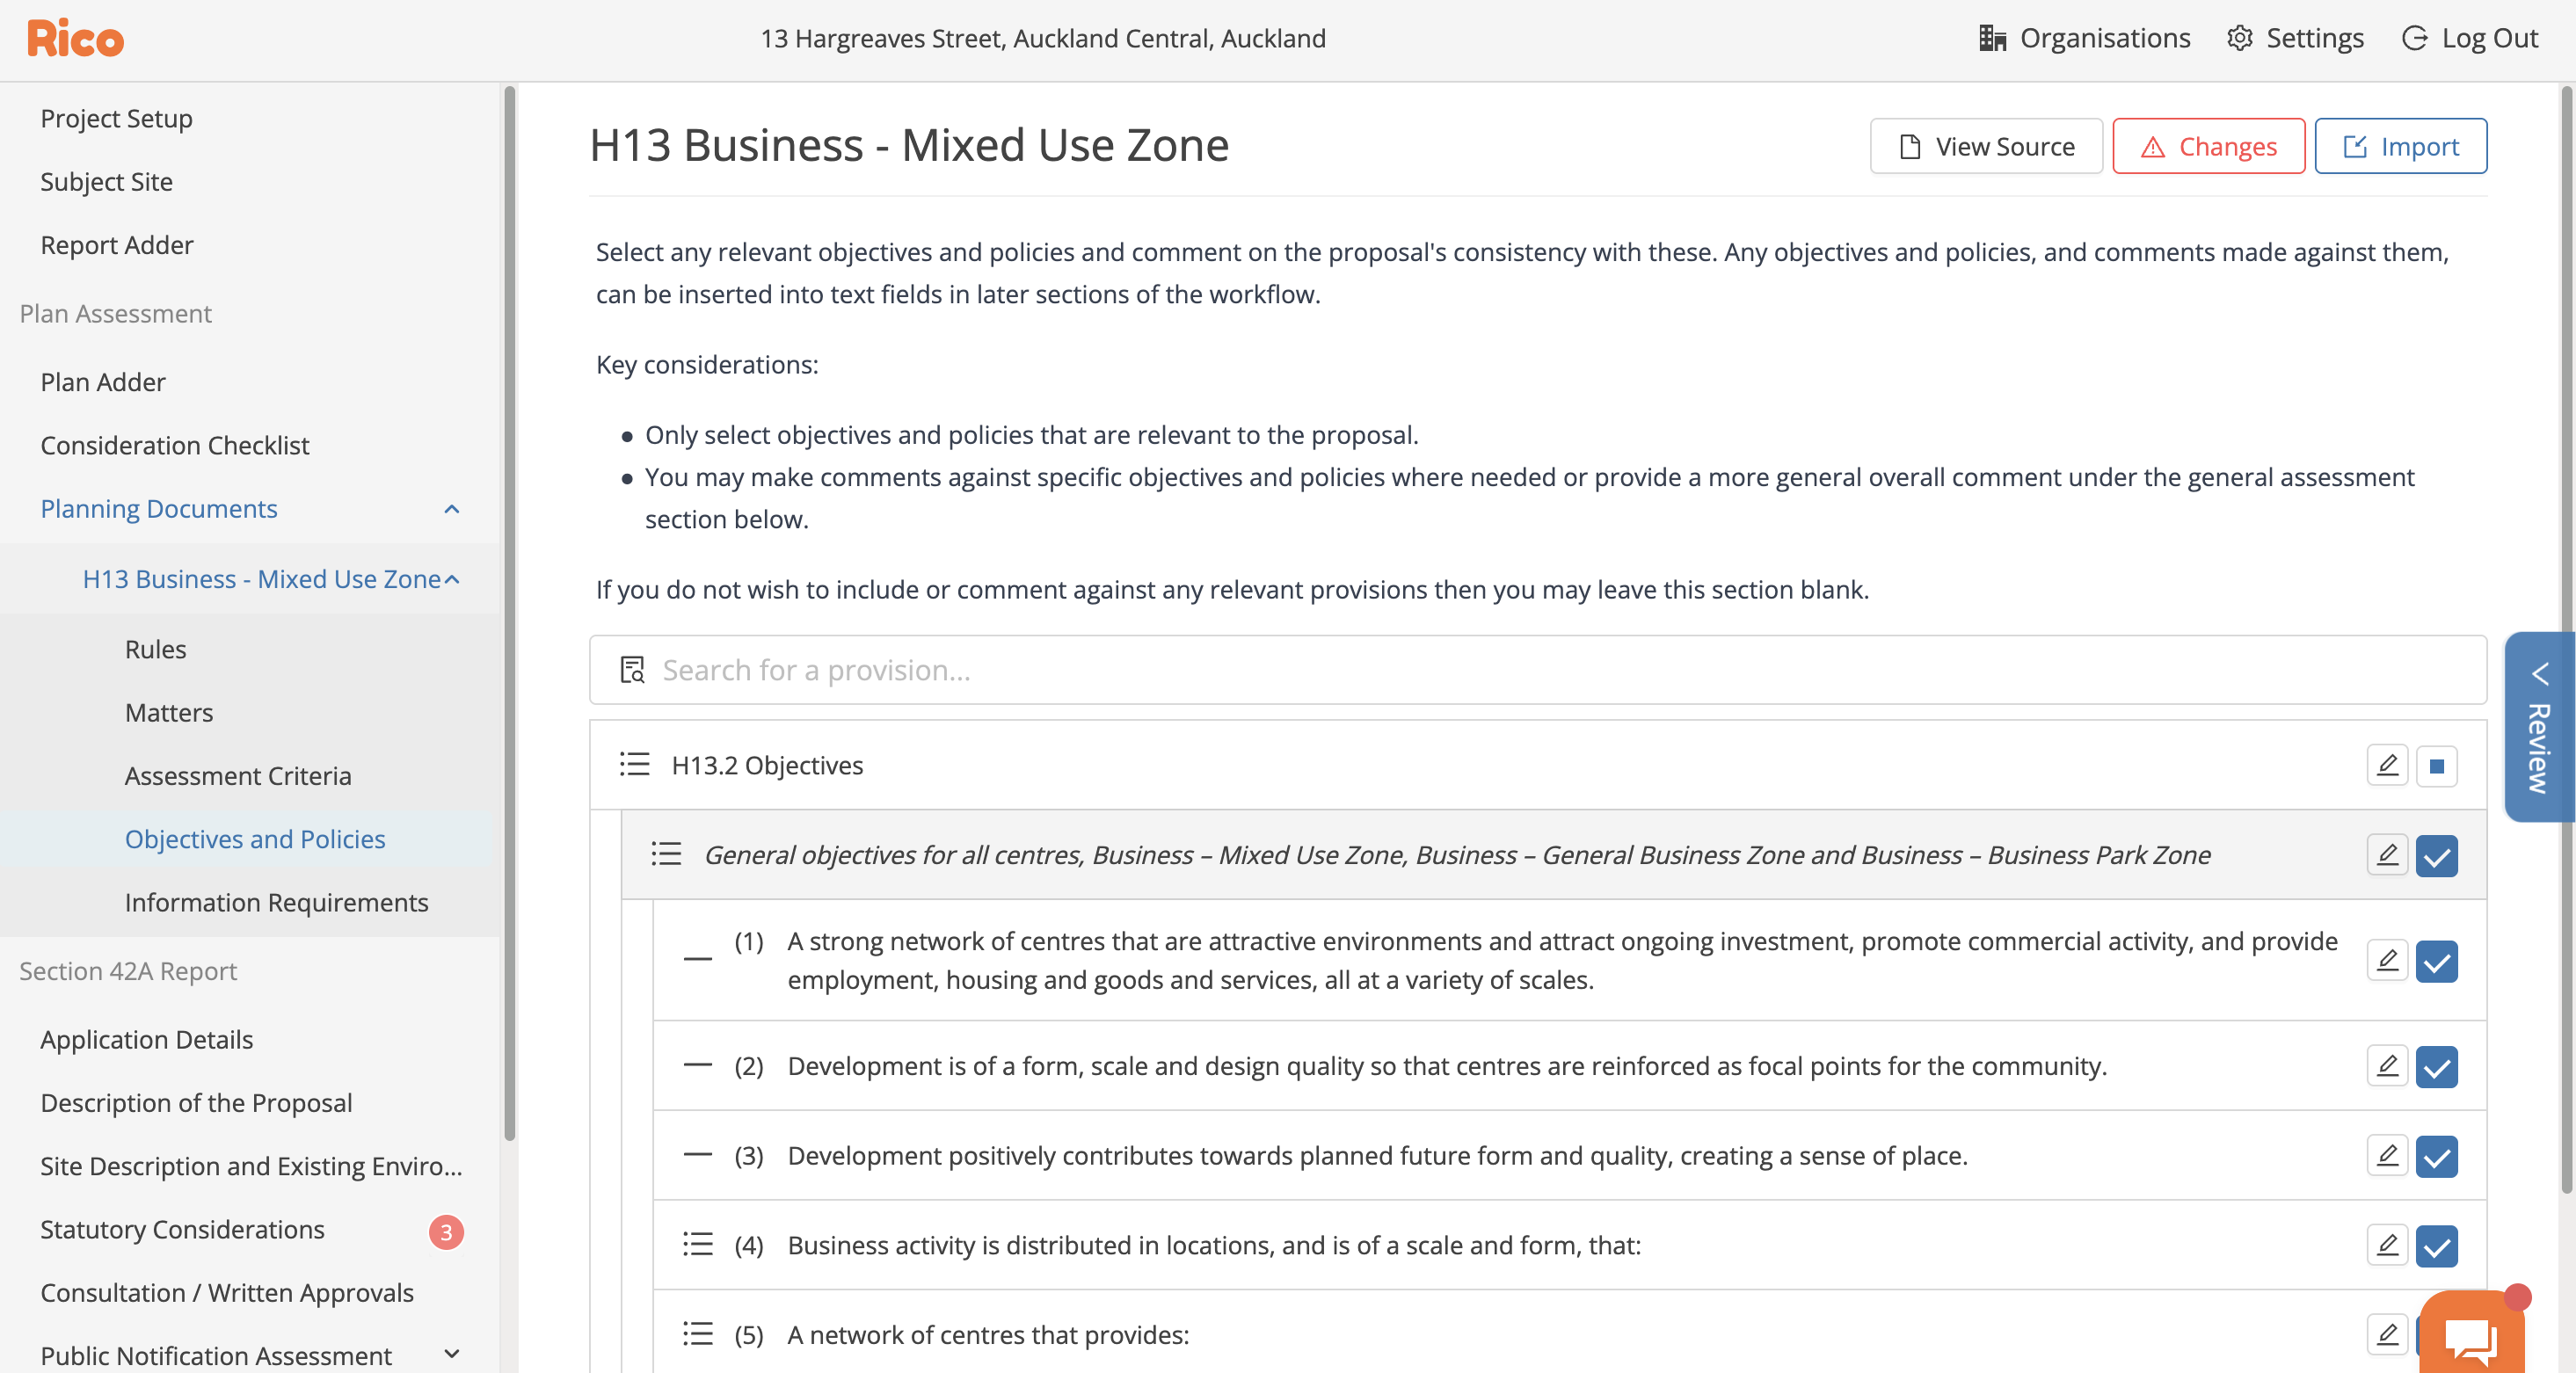
Advanced Tips
-
Comments are tied to the level of provision you click—this controls whether the comment applies to a group of provisions (if the provision you comment against has sub-points nested below) or an individual one (if it has no sub-points nested below).
Troubleshooting
-
If you’re using a general paragraph to address provisions in your main report, you can use this step to identify provisions for reference without commenting on each one.
-
Use discretion when selecting provisions—avoid cluttering reports with irrelevant content.
Qualitative Assessments
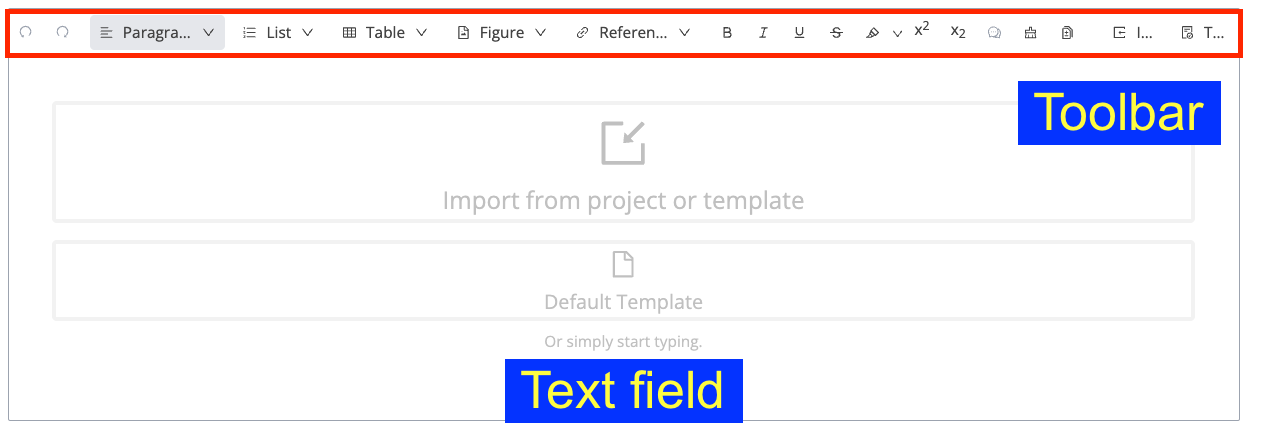
Text Fields
Core Functionality
-
Write narrative sections using structured text fields
-
Use Include/Exclude to toggle optional content being included in reports.
-
Format with headings, tables, lists, figures
-
Use the import function (explained further below) to start assessments with templated responses and assessments from past projects
Advanced Tips
-
Insert footnotes and cross-references where needed using the Insert Reference functions.
Troubleshooting
-
Can't see templates to import or import option? → When a text field is empty, these show by default. When there is text already, you can access this functionality using the Import function in the text field toolbar.
-
Can’t exclude a field? → It’s likely mandatory (this can be set as part of your configuration)
🔗 Using Text Fields, Styles, Formatting and Todos
🔗 Using Lists
🔗 Creating and Editing Tables in Text Fields
🔗 Adding and Inserting Figures
Import Function
Core Functionality
-
Import past project content directly into a text field or use it as a reference
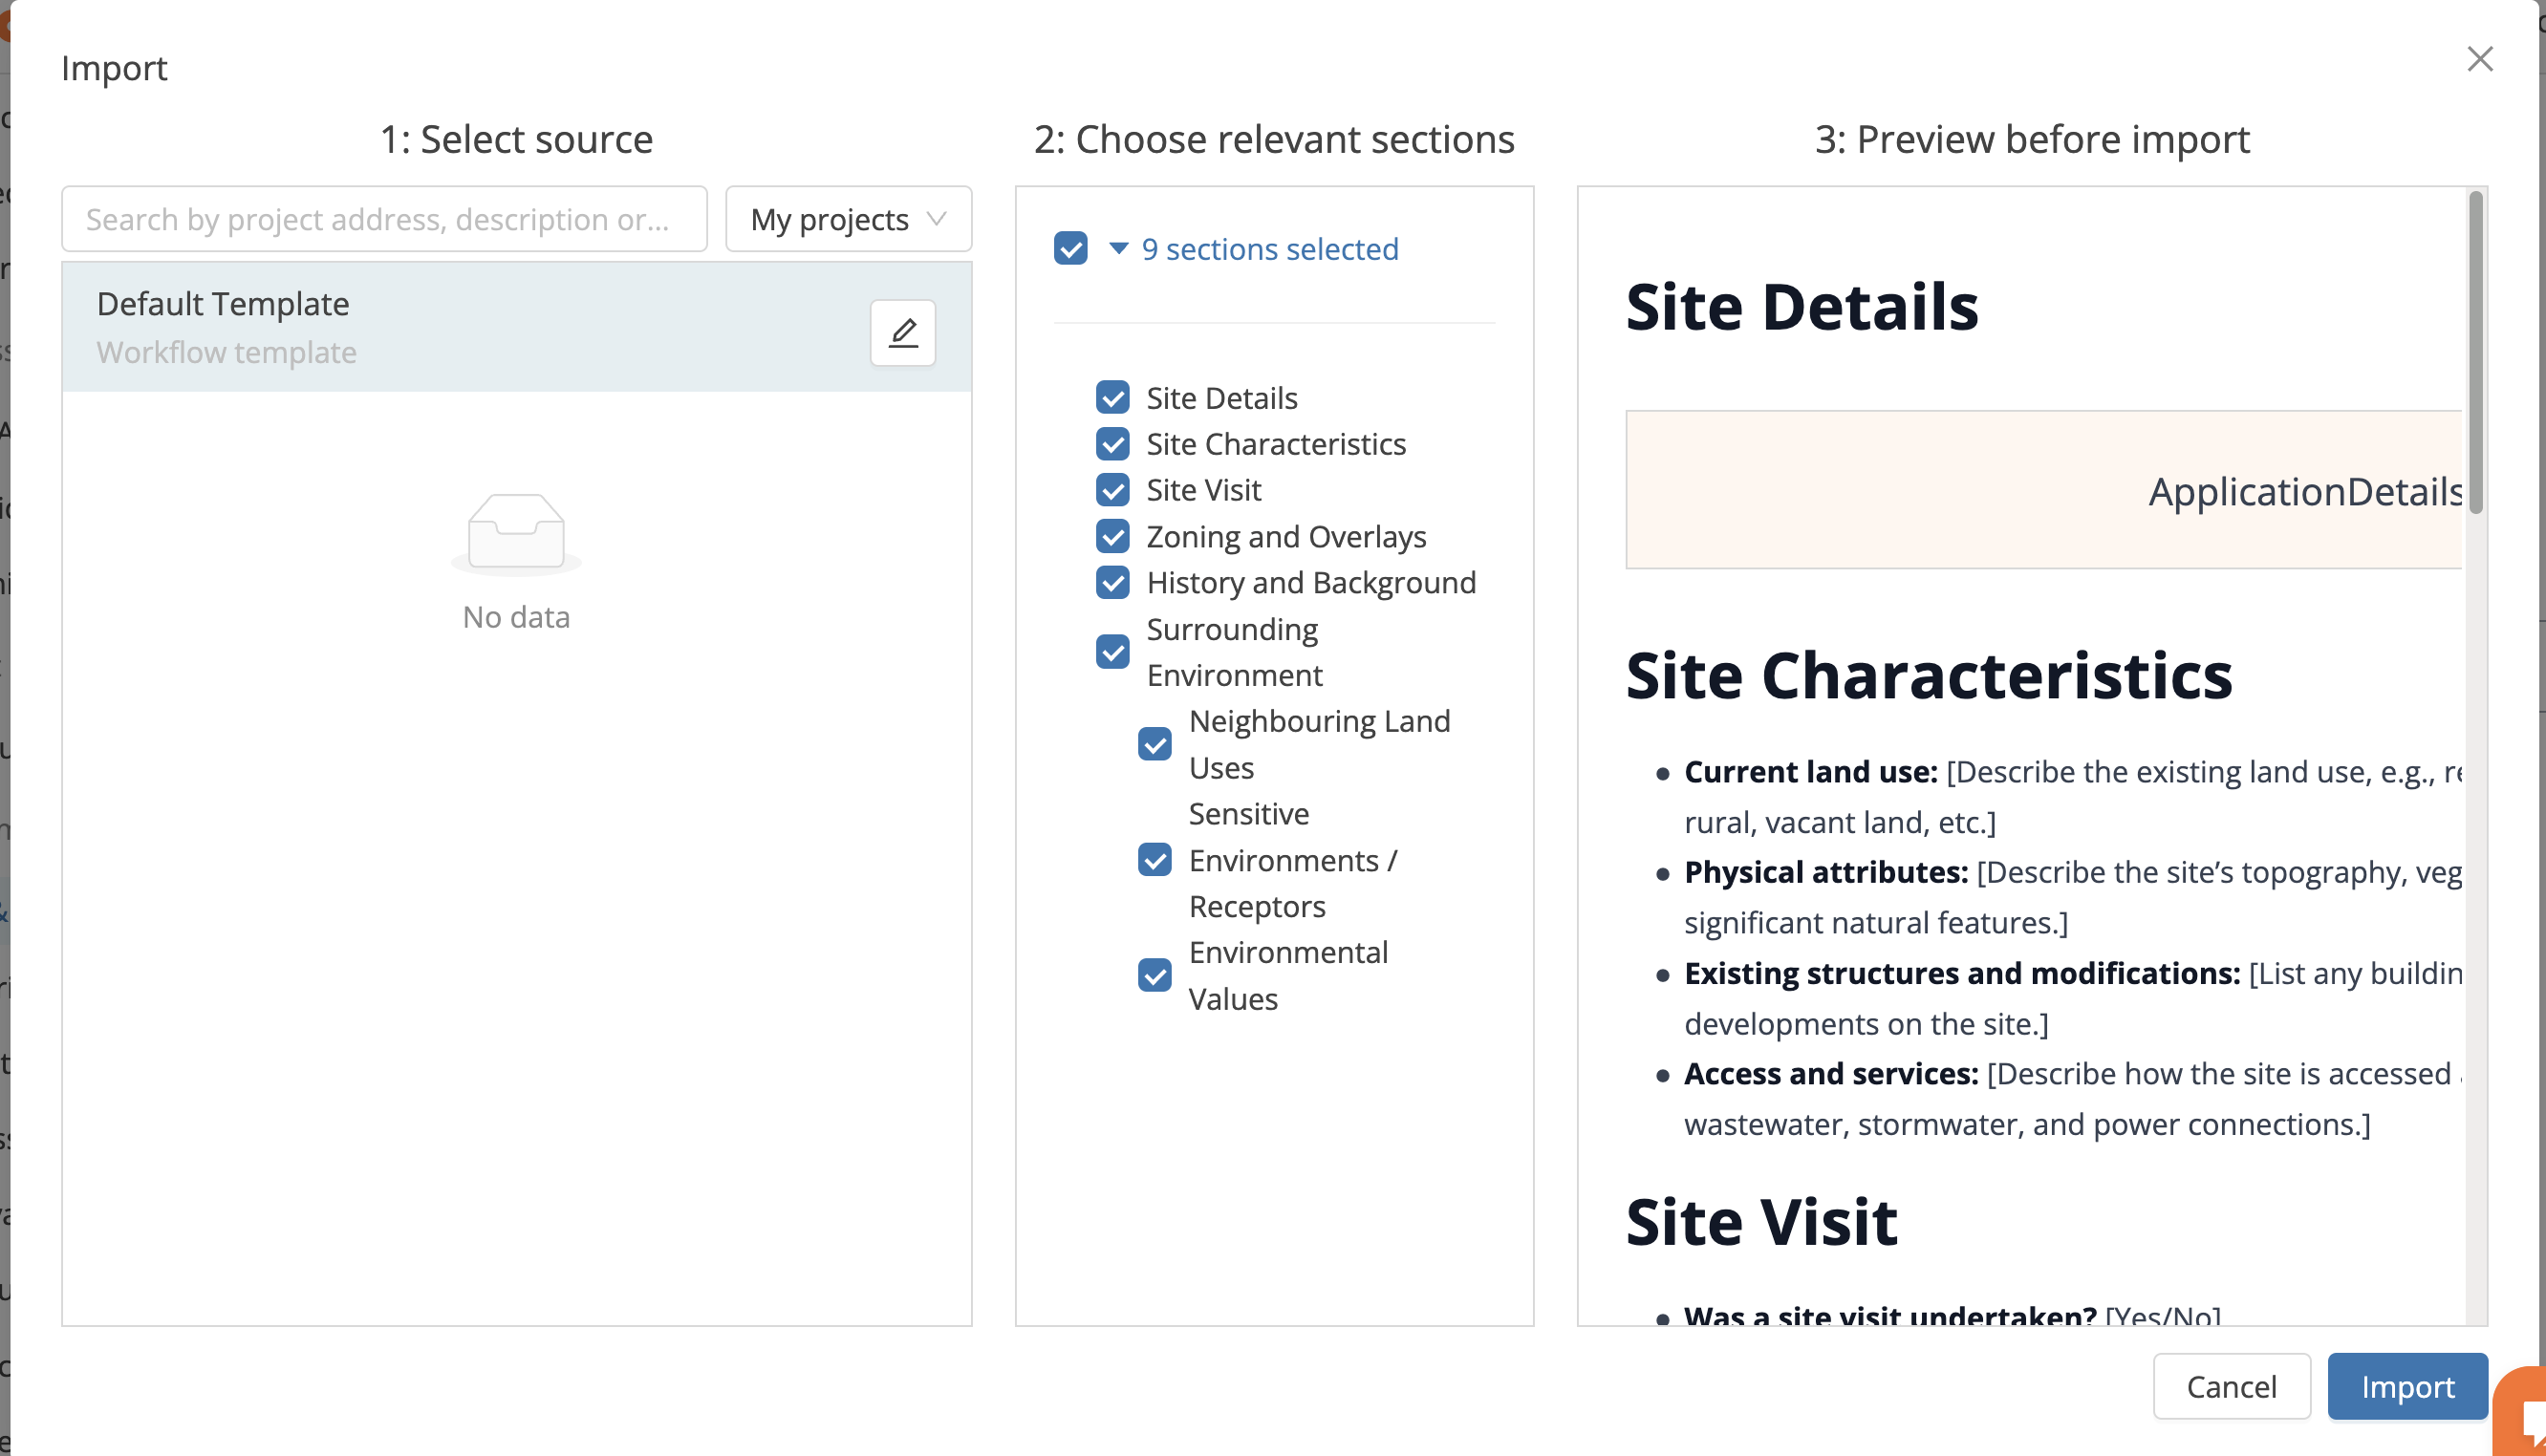
Advanced Tips
-
Change filter to "All Projects" if past projects aren’t appearing
Troubleshooting
-
Import not working? → Ensure content has been added and saved in the source project
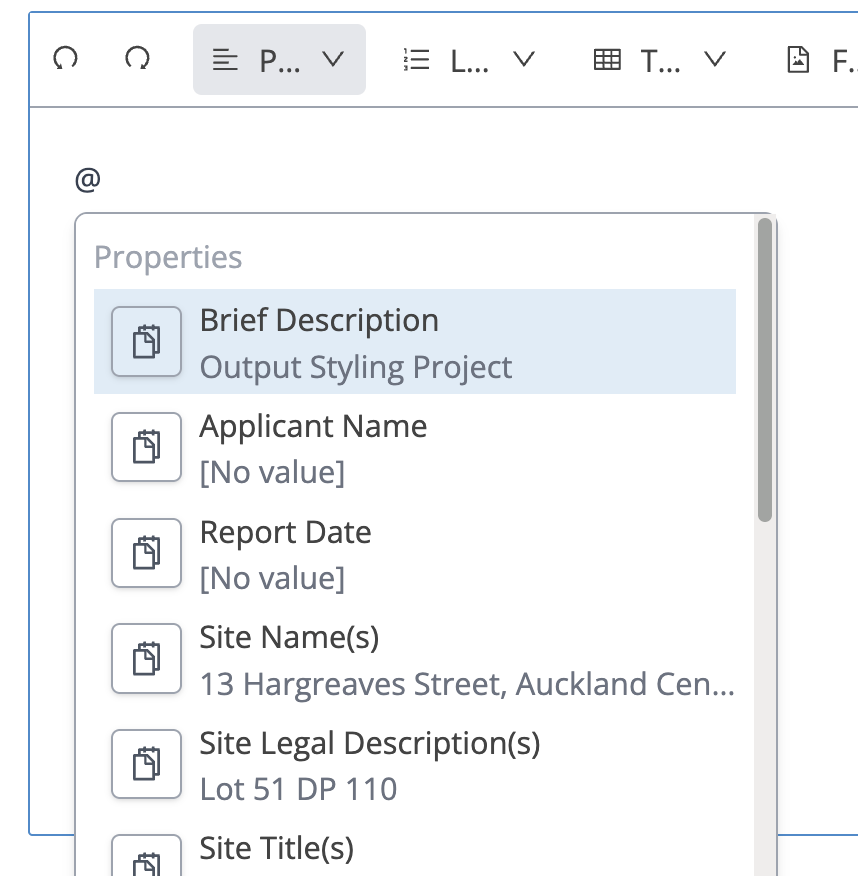
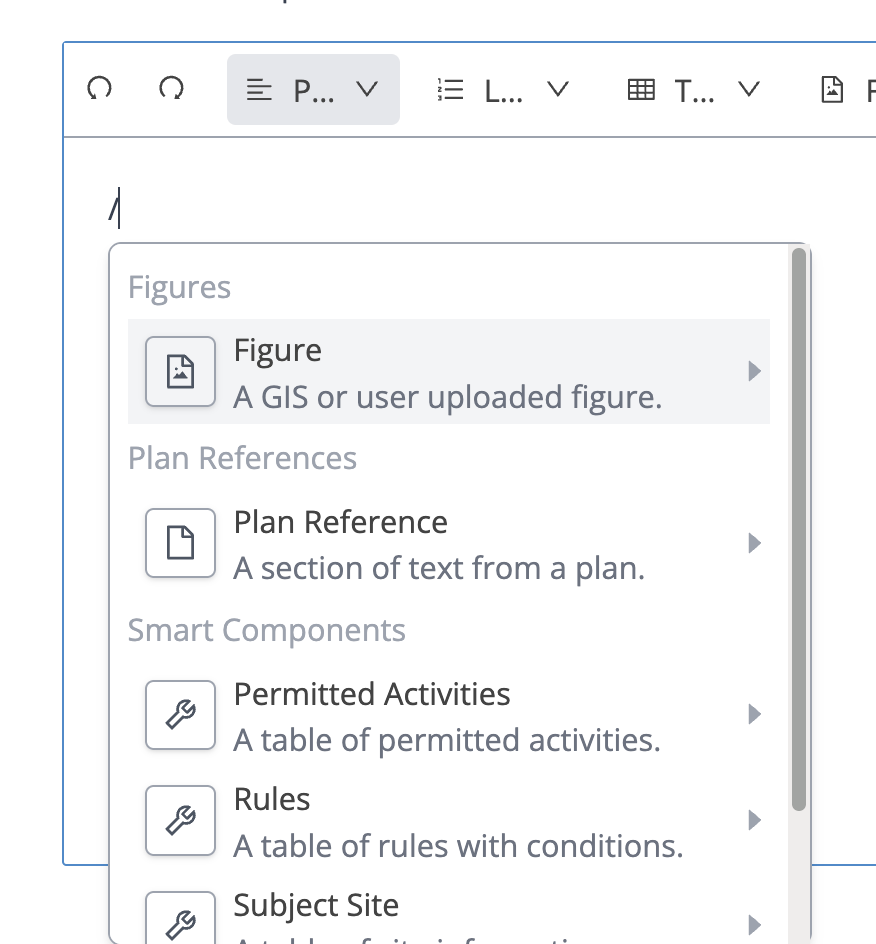
Inserting References (from Technical Assessment steps)
Core Functionality
-
Use @ and / to insert project data, plan references, rules, provisions, or appendices into text fields
Advanced Tips
-
Adjust filters using the gear icon to refine what’s inserted
Troubleshooting
-
Reference appearing blank? → Check if the source component in the technical assessment is complete
🔗 Inserting Project Properties, Plan References and Technical Assessments
Final Tip
We customise Rico to your organisation. If you think the configuration can be improved, contact Rico or a nominated 'Template Owner' within your organisation.