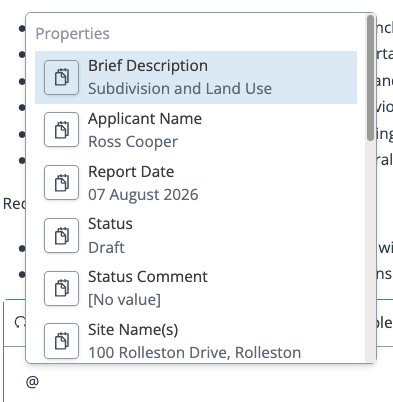
The '@' command pulls key project information into your document from a single source. To use it, type '@' anywhere in your text field and choose from the list of options presented.
The '@' command keeps key project information consistent throughout your report. Each reference is a live link to a field in Rico, so if the source information is updated, the change automatically pulls through to your report. No more find and replace!
Examples of project data that the ‘@’ command can draw from:
-
Any of the Project Properties on your 'Project Setup' page.
-
Site Name (Address), Legal Description, Site Titles, and Site Area from your 'Subject Site' page. As well as GIS information (if GIS enabled in your site area) such as Zones, Overlays, Precincts, Controls, and Other Notations.
-
Project Owner Name, Email, and Contact Number (set within Settings > User).
- Appendices, set within the 'Appendices' step in Rico, so you can reference them throughout your report
Advanced Functionality:
-
You can add a new custom property to your project in two ways: navigate to the 'Project Setup' page, or type '@' and scroll to the bottom of the options menu.
-
A custom property is useful when you'll be referencing a specific piece of information throughout the report.
-
Troubleshooting:
- Reference appearing blank? → Check that the source field has been filled out — the pages to check are listed above.
Looking to insert plan assessment tables? See Using the '/' Command to Insert Plan Assessment Tables
